ESP8266 and P10 LED Panels - Scrolling Text Display
Build a large-format scrolling text display using P10 LED panels and an ESP8266. Perfect for classrooms, storefronts, or home decor. Customize the message and watch it scroll across the panels in real time.
Project Demo
What You Need
Wiring
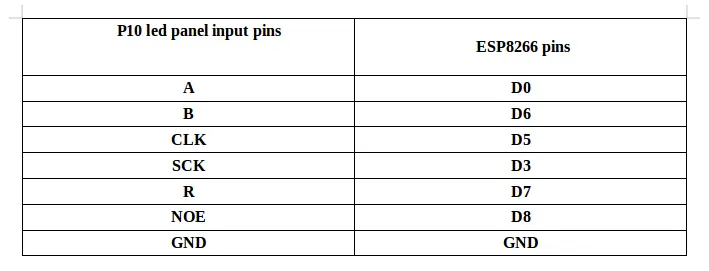
How to Build It
Connect the hardware
Arrange your P10 LED panels in a 2x1 configuration and connect them to each other. Use connecting cables to hook up the data input of the first panel to the ESP8266. Make sure your power supply can adequately power both the ESP8266 and the P10 panels.
Install the DMDESP library
Go to https://github.com/busel7/DMDESP, click Code > Download ZIP. Then in the Arduino IDE, go to Sketch > Include Library > Add .ZIP Library and select the downloaded DMDESP ZIP file. This library handles the P10 panel communication so you can focus on the message logic.
Upload the sketch
Download the sketch from GitHub and open it in the Arduino IDE. Modify the teks array to display your own custom message. Select your ESP8266 board and port, then upload.
Power up and test
Power on the ESP8266 and P10 panels. Your custom message should begin scrolling immediately. Adjust brightness and scroll speed in the sketch to suit your environment.
The Code
This project uses a standard sketch and a sketch that uses a webserver, both sketches are available on GitHub.
//P10 ESP8266 working code

#include <DMDESP.h>
#include <fonts/ElektronMart6x12.h>
#include <Wire.h>
#include <ESP8266WiFi.h>
#include <ESP8266WebServer.h>

// Wi-Fi Credentials
const char* ssid = "pythonessentials.com";     // Replace with your Wi-Fi SSID
const char* password = "*********"; // Replace with your Wi-Fi password

// SETUP DMD
#define DISPLAYS_WIDE 2  // Column
#define DISPLAYS_HIGH 1  // Row

// Number of P10 Panels used (COLUMN, ROW)
DMDESP Disp(DISPLAYS_WIDE, DISPLAYS_HIGH);

// Web Server
ESP8266WebServer server(80);

// Global variable for scrolling text
String scrollingText = "pythonessentials.com     BUILD + CODE + CREATE  ";

void setup() {
  Serial.begin(9600);  // Start serial communication
  Disp.start();
  Disp.setBrightness(255);
  Disp.setFont(ElektronMart6x12);

  // Connect to Wi-Fi
  Serial.println("Connecting to Wi-Fi...");
  WiFi.begin(ssid, password);

  while (WiFi.status() != WL_CONNECTED) {
    delay(500);
    Serial.print(".");
  }

  Serial.println("\nWi-Fi connected!");
  Serial.print("IP Address: ");
  Serial.println(WiFi.localIP()); // Print the local IP address

  // Set up the web server routes
  server.on("/", handleRoot);
  server.on("/update", handleUpdate);

  server.begin();
  Serial.println("Web server started!");
}

void loop() {
  Disp.loop();  // Run Disp loop to refresh LED
  server.handleClient();  // Handle incoming HTTP requests
  TeksJalan(0, 30);  // y position, speed;
}

// SCROLLING TEKS
void TeksJalan(int y, uint8_t kecepatan) {
  static uint32_t pM;
  static uint32_t x;
  int width = Disp.width();
  int height = Disp.height();

  Disp.setFont(ElektronMart6x12);
  int textWidth = Disp.textWidth(scrollingText.c_str());

  if ((millis() - pM) > kecepatan) {
    pM = millis();
    if (x < textWidth + width) {
      ++x;
    } else {
      x = 0;
      return;
    }
    Disp.drawText(width - x, (height / 2) - 6, scrollingText.c_str());  // Center the text vertically
  }
}

// Web server handlers
void handleRoot() {
  String html = R"rawliteral(
    <!DOCTYPE html>
    <html>
    <head><title>Update Text</title></head>
    <body>
      <h1>Update Scrolling Text</h1>
      <form action="/update" method="get">
        <input type="text" name="text" placeholder="Enter new text" style="width:300px;">
        <button type="submit">Update</button>
      </form>
    </body>
    </html>
  )rawliteral";
  server.send(200, "text/html", html);
}

void handleUpdate() {
  if (server.hasArg("text")) {
    scrollingText = server.arg("text");  // Update the scrolling text
    server.send(200, "text/plain", "Text updated! Go back to update again.");
    Serial.println("Updated text: " + scrollingText);
  } else {
    server.send(400, "text/plain", "No text received!");
  }
}
Troubleshooting
Text not displaying correctly
Check all connections between the ESP8266 and the P10 panels. Make sure the data lines are secure and not loose.
Display not powering on
Verify that your power supply voltage and amperage are adequate for both the ESP8266 and the number of P10 panels you are using.
Garbled text or flickering
Adjust the brightness setting in the sketch or check the refresh rate settings in the DMDESP library documentation.
Want to learn the fundamentals first?
The free Introduction to Arduino course on DevSTEM covers everything you need before tackling beginner projects like this.
Start the Course